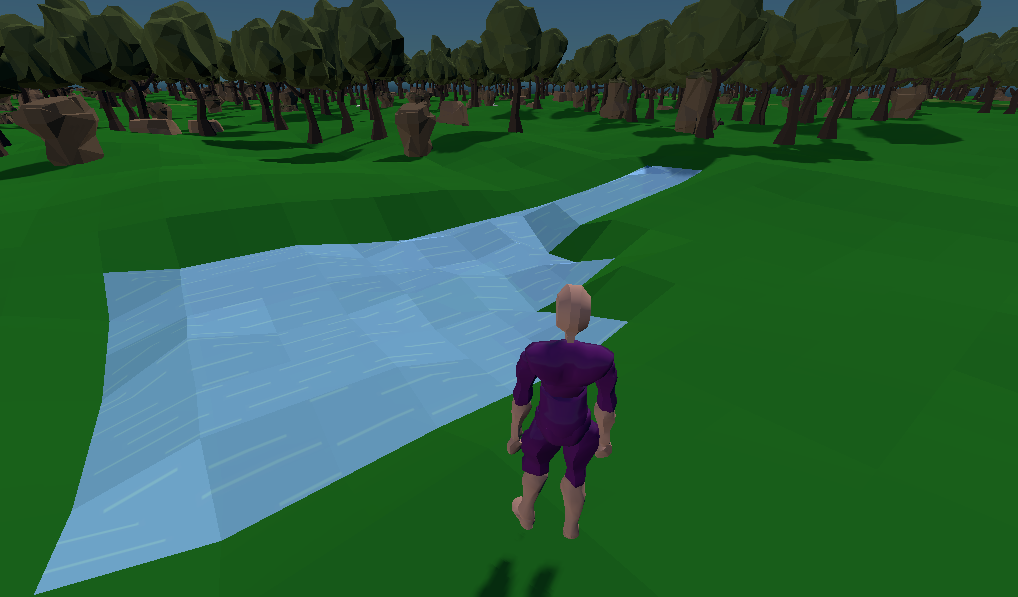
(Godot) Water Experiments
August is a nice month: you start harvesting fruits and vegetables from the garden, the temperature comes down to warm and I can go run outside during the day! It’s too bad that the interns at work are going back to school, when they were starting to produce quality, though. At home, that gives me a small amount of free time to do fun coding. The past couple of weeks, I have been experimenting with adding a water surface to my Godot project.
Water Surface
There were a few decisions to ponder upon before starting to write the water surface mesh algorithm. The first decision is whether to add a complete surface for the water. I’ve built the complete water surface mesh idea before. It involves various tricks like moving the water heights below the surface heights to selectively hide it. It is not very flexible, but is quick to implement. I wanted a new challenge, so I decided to write a new complex custom mesh generation algorithm. I know that it can obtain a better visual quality, trading-off the performance cost of generating the mesh.
The second decision to make is how to encode the water height for each cell in the terrain tile. Using a relative height value makes for simpler math, but writing an absolute height value is more precise. I’ve decided to use a relative height value, but also to hide this decision within isolated API functions, so that I can change it later if needed.
Improved Terrain Mesh
Previously, my terrain used one regular quad (or two triangles) for each cell in the terrain tile. Since there are 64x64 cells in each terrain tile: that means 8k triangles for each terrain tile. To improve my meshing algorithms, I had made the assumption that the recorded cell height to be at the center of the cell. With this tessellation algorithm of two triangles per cell, the cell height was hence never seen directly. It was more similar to a control value than a real height visible to the player.
Adding the water layer to the terrain, I wanted to devise an algorithm that would look good even if the water covers only one cell. My first experiment simply added a water quad above the cell and used skirts to complete the mesh. This gave me a valid surface, but was quite unrealistic, since the water hovered above the surface in all cases: it was even impossible to create a realistic lake or river.
That’s why I decided to change the tessellation algorithm for each cell in the terrain tile to use a star pattern and 8 triangles per cell. Since there are 64x64 cells in each terrain tile: that means 32k triangles for each tile. This is quite a bit more triangles and slows down the generation of the tile mesh, but the trade-off is that the visual quality is nicely improved.
Star Pattern Mesh
This screenshot shows the two options for tessellating the cell with 9 vertices instead of 4. I’ve manually highlighted, in red, some of the cell borders.
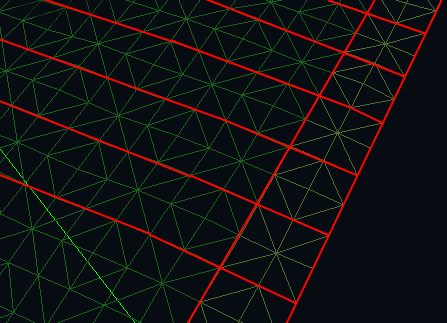
I’ve chosen the star pattern, instead of the diamond pattern, because it gives a full pyramid when the water is above ground.
Scrolling Texture Shader
I’ve followed this video by Bastiaan Olij in order to know how to write my own scrolling texture animation in Godot 3. I’ve pasted the code below, for reference. Writing this shader animation was easy and fun. The Godot 3 editor makes iterating over the code easy and the error messages provided when you make mistakes in the code are well-explained.
The Godot 3 engine reference page on the shader language is also a good reference, now that I’ve gotten the basics from the video linked above.
shader_type spatial;

uniform sampler2D map;
uniform float alpha;

void vertex() {
    UV.y += TIME * 0.05;
}

void fragment() {
    ALBEDO = textureLod(map, UV, 0).rgb;
    ALPHA = alpha;
}