(Godot) Paper Doll
Putting aside my thoughts on multi-threading, I’ve decided to prototype a paper doll for Godot. Godot is a cool, light-weight game engine that’s gaining in popularity, right now. Adding a paper doll to Godot will allow me to experiment with some character variety ideas that I have. Mixamo is a great place to start for animations and it offers two skinned characters that I think will be a great starting point for a stylized paper doll: XBot and YBot.
What's a Paper Doll?
Wikipedia describes briefly, on this page, the thousand years history behind paper dolls. The original concept is simple: you draw, on paper, one doll body and a large set of interchangeable accessories that the child can choose and attach to the doll body. The idea behind paper dolls translates easily into 2D games. In a 3D world, the concept resembles more the Mr. Potato Head toy. A paper doll uses a set of interchangeable static meshes and animates them separately, on top of a skeleton. A paper doll system can be opposed to the skinned character system that AAA video games use. But there exists mixed systems that successfully include both skinned character ideas and paper doll ideas, such as Daz3D’s impressive realistic 3D human figures, or Klei Entertainment’s beautiful character sprites.
In the early 2000’s, using a set of static meshes was the standard to display 3D human characters, in video games. In terms of quality and performance, skinned characters offer a great improvement over multiple static meshes. There’s one advantage where paper dolls beat skinned characters and that’s quickly generating variety, using material changes. Since the body parts of the character are separated meshes, you can easily change the color of the character’s skin, hair or clothing, programatically.
Paper Doll Pipeline
For this prototype, I’m going to split the body parts of the YBot from Mixamo, into its elemental parts. I want to introduce <a href=https://www.blender.org/”>Blender</a> as a necessary step, so I can do simplifications to the YBot. I don’t need fingers and eyes in my personal projects. Later, using Blender, I can author new accessories and bring them into Godot to add a variety of shapes to the paper doll.
Adding a bind-pose animation in Godot is necessary creating a paper doll system. When attaching an accessory to the paper doll skeleton (hair, a shovel, boots..), it needs to be done in its bind-pose. Creating and fitting new accessories, in Blender, is also done on the paper doll skeleton that is in its bind pose.
Exporting the Bind-Pose
- To see the Mixamo bind-pose in Blender, you will need to import the animation with the skin out of Mixamo.
- After importing the COLLADA document into Blender, you should see the character in its bind-pose.
- Clear the animation data, so the skin and bones stay in the bind-pose through all other operations.
- Select all the bones in Blender and insert a single keyframe for them.
- Export this simple animation and bring it into Godot using the above-described process.
Animation Pipeline
A stylized paper doll in Godot isn’t useful without animations. This is the pipeline that I devised to easily bring the Mixamo animations into Blender and into Godot, so they can be used with the paper doll skeleton.
Mixamo
- Choose the character, either YBot or XBot. I used YBot.
- Select an animation that you want to export.
- Download: Format is DAE, without skin, at 30 fps and set “Uniform Keyframe Reduction”.
Blender
- Create a new scene.
- Import the DAE file with the animation. It is important to set the import flags: “fix bone leaves”, “find bone chains”, “auto connect”.
- Select the Armature’s Armature child.
- Remove the 4 toe bones, the 30 finger bones, the 2 eye bones, and the head-top bone: you should be down to 20 bones.
20 bones is already quite a lot for a paper doll, so I’ll have to test the scalability later. - Export back into DAE.
Godot
- Open the DAE scene that you just exported out of Blender, into Godot.
- Select the Animation Controller.
- Play the Animation to ensure that it looks fine on the skeleton.
- In the Animation Timeline, press the “Save As” button.
- Open the Paperdoll scene in Godot. “Load from disk” the animation into its Animation Controller.
Results
In this image, you can see the YBot paper doll on the left and the YBot skinned character on the right. Both are playing a walking animation from Mixamo.
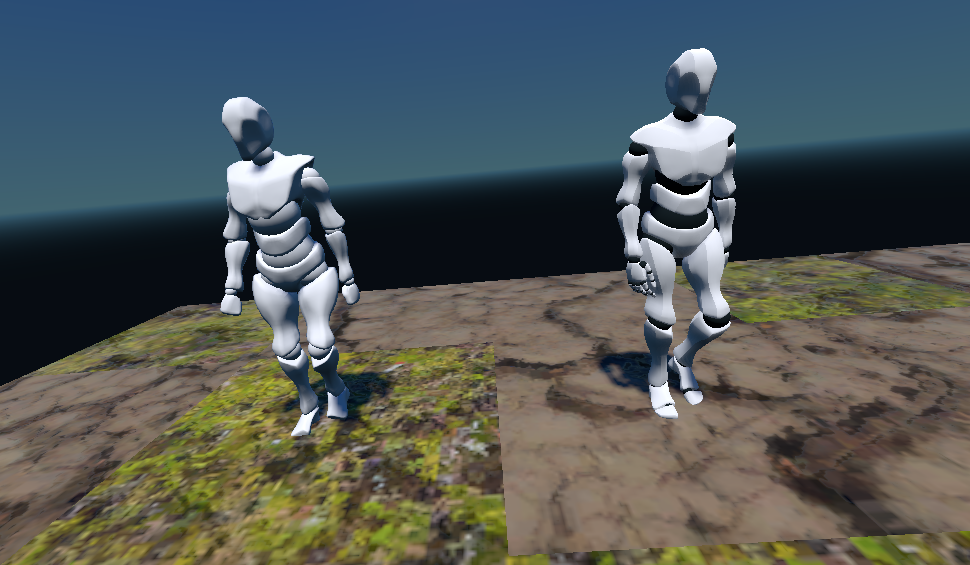
I think the idea shows a promise of generating a lot of variety, but as you can see in the screenshot, there are a few differences:
- YBot’s torso is originally attached to three bones. This rounds the shoulders of the YBot skinned character.
The paper doll version of YBot cannot be influenced by three bones. The torso static mesh is simply attached to the last spine bone, so I will need to modify the origianl torso mesh so remove the spikiness. - Mixamo uses two different materials for YBot: a darker material on the spheres that highlight the joints, a lighter material on the mesh that gives a human appearance.
In order to reduce the explosive amount of static meshes, I merged those in my paper doll.